Jak zrobiłem własny date picker w React & TypeScript?
Mam dość dziwną “obsesję” - mam “chcicę” na stworzenie czegoś, czego wcześniej nie dotykałem
Chociażby wirtualizacja listy, którą chciałem sobie zrobić po rekrutacji, ale nigdy o tym nie myślałem wcześniej 
Ale dobra, wracamy do tematu.
ale po cholerę tworzyć własny date picker?
chociażby po to, aby poćwiczyć sobie pracę z datami (Date API jest takim gównem, że ja jebe 🤮 #czekamNaTemporalAPI) i będziesz dogłębnie rozumieć, jak taki komponent funkcjonuje “pod maską”.
tak więc - JAZDA 😈😈😈
najpierw zaczniemy od planowania takiego date pickera
ten picker będzie powstawać na bazie date pickera z Windowsa, który wygląda mniej więcej tak:
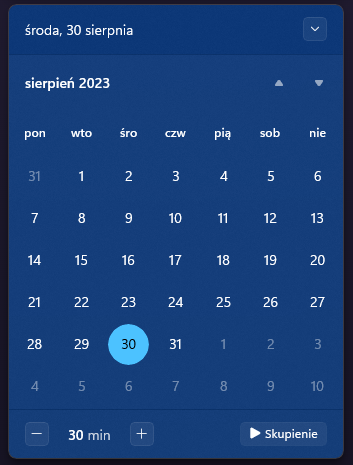
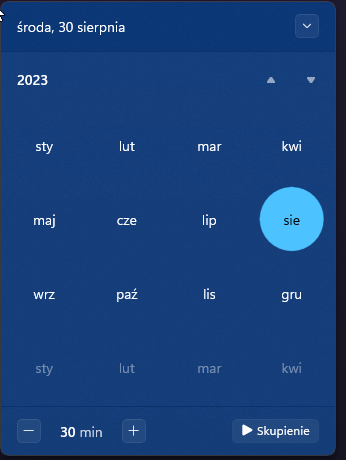
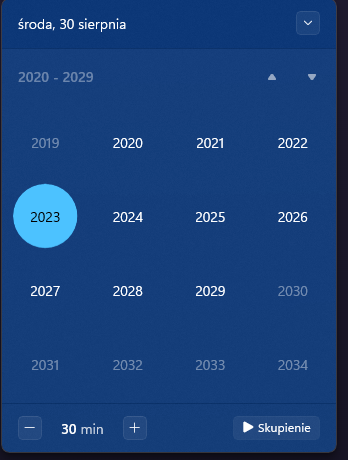
tak więc będziemy odtwarzać wszystkie widoki jakie ten kalendarz posiada
ISTOTNY DISCLAIMER: w tym artykule powstanie date picker w wersji “headless”, czyli bez żadnych styli. Mam w planach, aby w następnym artykule rozszerzyć owy komponent o style i animację, żeby wyglądał cacy 😎
czyli co musimy ogarnąć?
- generowanie dni (z poprzedniego miesiąca, aktualnego i następego),
- generowanie miesięcy,
- generowanie lat (w Windows to jest odpowiednio 100 lat od i z aktualnego roku),
- możliwość przełączania się między dniami/miesiącami/latami,
- możliwość włączania/wyłączania date pickera i pokazywania zamiast niego menu z aktualną godziną i datą.
coś takiego: 
tak więc bierzmy się za “mięsko” i za kodzenie 🔥
na początku wraz z Copilotem wygenerowaliśmy taki kod, który generuje daty aktualnego miesiąca:
const daysInCurrentMonth = (now: Date) => {
  const daysInMonth = new Date(
    now.getFullYear(),
    now.getMonth() + 1,
    0
  ).getDate();

  return Array.from(
    { length: daysInMonth },
    (_, i) => new Date(now.getFullYear(), now.getMonth(), i + 1)
  );
};
tak wygląda output:
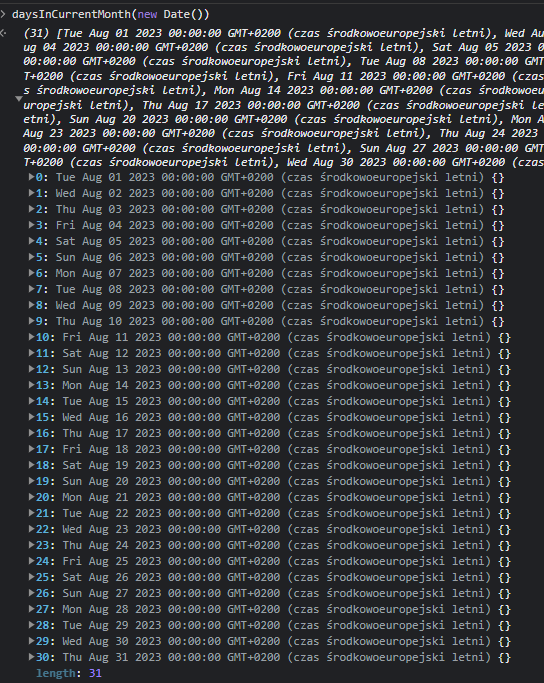
to było całkiem proste, ale trochę większym wyzwaniem było generowanie dni poprzedniego miesiąca.
zastanawiałem się nad tym, jak to zrobić - tak więc skorzystałem z Erasera i rozrysowałem w taki sposób:
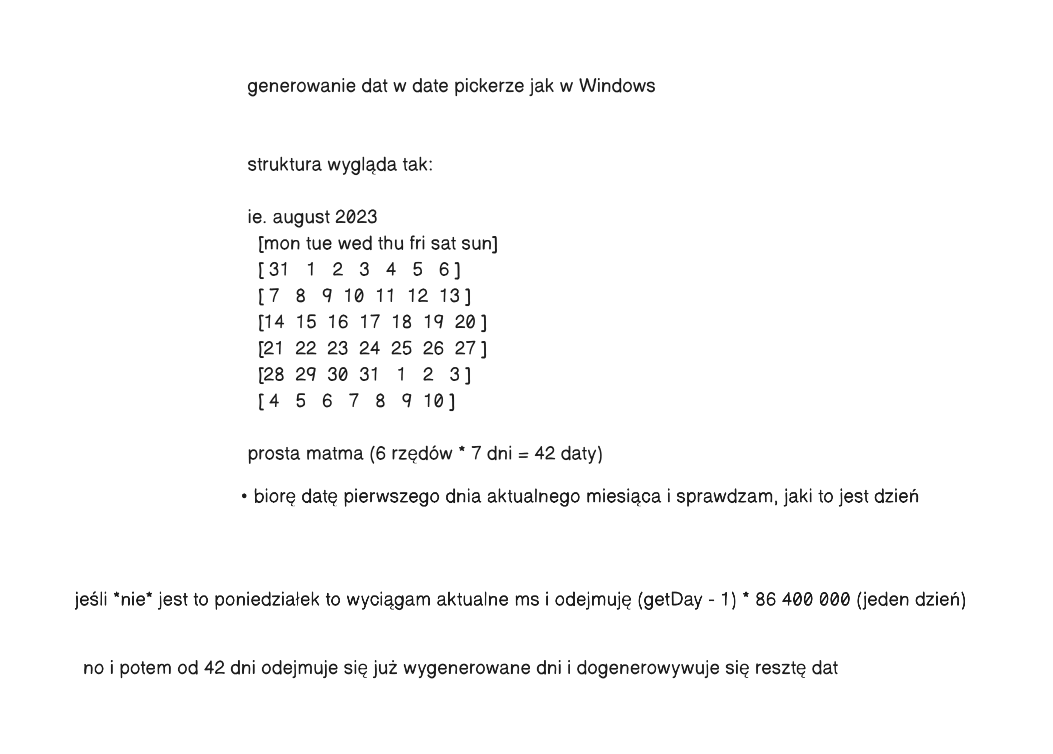
no i pomału zaczęło się klarować to, jak mam to zrobić.
tak więc siadłem do kodu i podążając rozpisanym pomysłem zrobiłem taki kod:
const daysInPreviousMonth = (now: Date) => {
  const firstDayInMonth = new Date(now.getFullYear(), now.getMonth(), 1);

  const generateDays = () => {
    const oneDayInMS = 24 * 60 * 60 * 1000;
    const monday = new Date(
      firstDayInMonth.getTime() - (firstDayInMonth.getDay() - 1) * oneDayInMS
    );

    return Array.from(
      { length: firstDayInMonth.getDay() - 1 },
      (_, i) =>
        new Date(
          monday.setDate(i === 0 ? monday.getDate() : monday.getDate() + 1)
        )
    );
  };

  const isMonday = firstDayInMonth.getDay() === 1;

  return isMonday ? [] : generateDays();
};
w taki sposób ogarnęliśmy sobie generowanie dni z poprzedniego miesiąca 😎

dobra, zostało nam wyłącznie generowanie dni z następnego miesiąca, ale teraz będzie to pestka, ponieważ będziemy to opierać o to, ile dat dotychczas wygenerowaliśmy i ile nam brakuje do magicznych 42 dat.
kod prezentuje się w taki sposób:
const daysInNextMonth = (daysToGenerate: number) => {
  const now = new Date();
  const lastDayInCurrentMonth = new Date(
    now.getFullYear(),
    now.getMonth() + 1,
    1
  );

  return Array.from(
    { length: daysToGenerate },
    (_, i) =>
      new Date(
        lastDayInCurrentMonth.setDate(
          i === 0
            ? lastDayInCurrentMonth.getDate()
            : lastDayInCurrentMonth.getDate() + 1
        )
      )
  );
};
użycie:
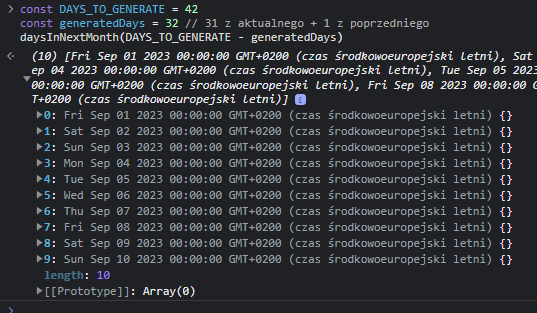
tak więc prezentuje się wszystko razem, który załatwia pkt. 1:
const generateDaysForCalendar = (date: Date = new Date()) => {
  const DATES_TO_GENERATE = 42; // 6 rows of 7 days, like in Windows calendar

  const prevMonth = daysInPreviousMonth(date);
  const currentMonth = daysInCurrentMonth(date);

  const generatedDays = prevMonth.length + currentMonth.length;

  return [
    ...prevMonth,
    ...currentMonth,
    ...daysInNextMonth(DATES_TO_GENERATE - generatedDays),
  ];
};
teraz będzie trochę z górki, bo wygenerowanie miesięcy było bardzo proste:
const generateMonths = () => {
  const now = new Date();

  return Array.from({ length: 12 }, (_, i) => {
    const date = new Date(now.getFullYear(), i + 1, 0);
    return {
      month: date.toLocaleString(navigator.language, {
        month: "short",
      }),
      num: date.getMonth(),
    };
  });
};
(dodatkowo skorzystałem z navigator.language, aby generowało daty w zależności od języka przeglądarki)
a wygenerowanie ostatnich i następnych 100 lat było wręcz banalne:
// generate the last 100 years and the next 100 years
const generateYears = () => {
  const currentYear = new Date().getFullYear() - 100;
  return Array.from({ length: 200 }, (_, year) => currentYear + year);
};
oczywiście years oraz months będziemy trzymać poza komponentem, aby wygenerowywać je tylko raz, bo po co więcej razy?
no dobra, teraz przejdzmy do stworzenia Reactowego komponentu
na początku stwórzmy minimalistyczne menu z godziną i datą:
const DatePicker = () => {
  const [mode, setMode] = useState<"simple" | "expanded">("simple");
  const [shortDate, setShortDate] = useState(new Date());

  useEffect(() => {
    const interval = setInterval(() => {
      setShortDate(new Date());
    }, 1000);

    return () => clearInterval(interval);
  }, []);

  const toggleDatePicker = () => {
    setMode((prevMode) => (prevMode === "simple" ? "expanded" : "simple"));
  };

  return (
    <div>
      <button onClick={toggleDatePicker}>
        <menu className="date-picker-simple">
          <p>
            {shortDate.toLocaleTimeString(navigator.language, {
              hour: "numeric",
              minute: "numeric",
            })}
          </p>
          <p>{shortDate.toLocaleDateString()}</p>
        </menu>
      </button>
    </div>
  );
};
ten komponent prezentuje się w taki sposób:

proste, ale o to nam nie chodzi - czas na stworzenie “rozszerzonego” date pickera:
tak więc zaczniemy od obsłużenia toggle’a i wyrenderowania dni, gdy date picker jest “wysunięty”:
const DatePicker = () => {
  const [mode, setMode] = useState<"simple" | "expanded">("simple");
  const [shortDate, setShortDate] = useState(new Date());

  const [pickerMode, setPickerMode] = useState<"days" | "months" | "years">(
    "days"
  );

  const [datePickerDate, setDatePickerDate] = useState(new Date());

  useEffect(() => {
    const interval = setInterval(() => {
      setShortDate(new Date());
    }, 1000);

    return () => clearInterval(interval);
  }, []);

  const toggleDatePicker = () => {
    setMode((prevMode) => (prevMode === "simple" ? "expanded" : "simple"));
  };

  const days = generateDaysForCalendar(datePickerDate);

  return (
    <div>
      {mode === "expanded" && (
        <menu>
          <h1>Current: {shortDate.toDateString()}</h1>

          {pickerMode === "days" && (
            <ul className="date-picker-days">
              {days.map((day, i) => (
                <li key={i}>
                  <button>{day.getDate()}</button>
                </li>
              ))}
            </ul>
          )}
        </menu>
      )}

      <button onClick={toggleDatePicker}>
        <menu className="date-picker-simple">
          <p>
            {shortDate.toLocaleTimeString(navigator.language, {
              hour: "numeric",
              minute: "numeric",
            })}
          </p>
          <p>{shortDate.toLocaleDateString()}</p>
        </menu>
      </button>
    </div>
  );
};
style:
ul {
  list-style: none;
}

.date-picker-days {
  display: grid;
  grid-template-columns: repeat(7, 50px);
  grid-template-rows: repeat(6, 50px);
}
i w taki sposób prezentuje się owy komponent:
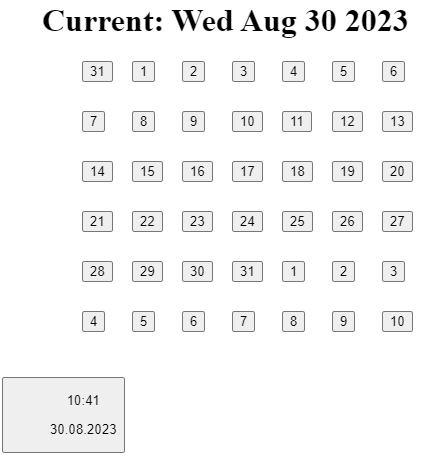
widać, że renderuje dni identycznie jak w date pickerze Windowsa 😊
dobra, teraz ogarnijmy przełączanie się między miesiącami:
  const handlePreviousMonth = () =>
    setDatePickerDate(
      new Date(datePickerDate.setMonth(datePickerDate.getMonth() - 1)),
    );

  const handleNextMonth = () =>
    setDatePickerDate(
      new Date(datePickerDate.setMonth(datePickerDate.getMonth() + 1)),
    );

  return (
     <button
        onClick={() => {
          setPickerMode("months");
        }}
      >
        {datePickerDate.toLocaleString(navigator.language, {
          month: "long",
          year: "numeric",
        })}
    </button>

    <button onClick={handlePreviousMonth} aria-label="Previous month">
          ←
    </button>
    <button onClick={handleNextMonth} aria-label="Next month">
          →
    </button>
  )
No i ogarnęliśmy to stary:
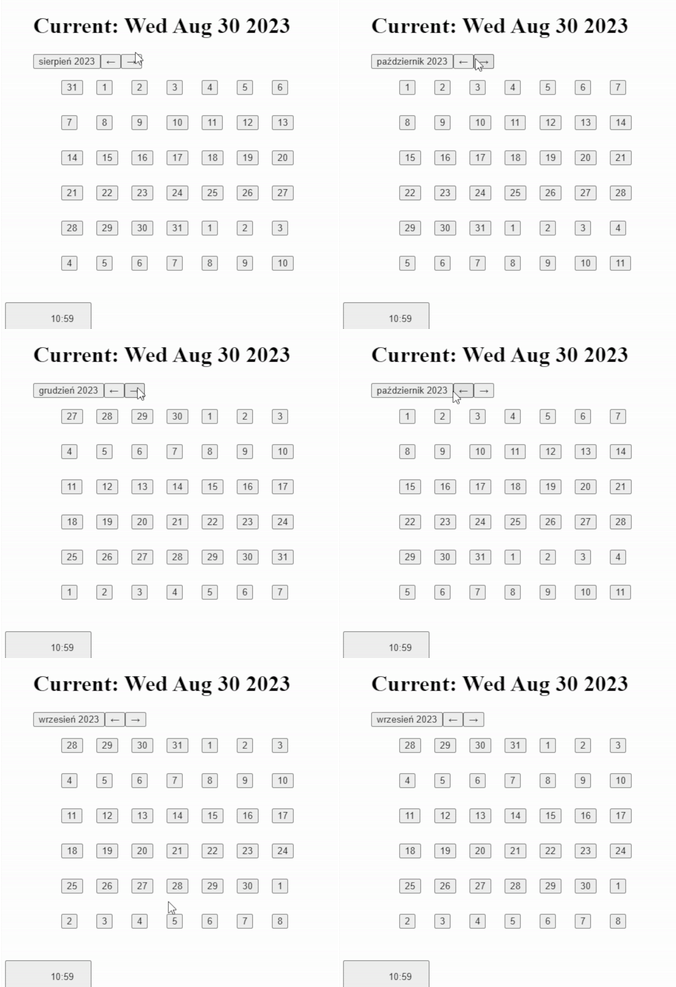
Teraz zajmiemy się kolejnym ficzerem, czyli wyświetlaniem miesięcy:
 {pickerMode === "months" && (
            <ul className="date-picker-months">
              {months.map(({ month, num }) => (
                <li key={month}>
                  <button
                    onClick={() => {
                      setDatePickerDate(
                        new Date(datePickerDate.getFullYear(), num, 1)
                      );
                      setPickerMode("days");
                    }}
                  >
                    {month}
                  </button>
                </li>
              ))}
            </ul>
          )}
style:
.date-picker-months {
  list-style: none;
  display: grid;
  grid-template-columns: repeat(4, 50px);
  grid-template-rows: repeat(4, 50px);
}
i w taki sposób mamy już wyświetlanie miesięcy 😊
no i wisienka na torcie, czyli wyświetlanie lat:
    useEffect(() => {
        if (pickerMode !== "years") return;

        yearRef.current?.scrollIntoView({
          block: "center",
        });
      }, [pickerMode]);

      return
          // ...
          {pickerMode === "years" && (
            <ul className="date-picker-years">
              {years.map((year, i) => (
                <li
                  key={i}
                  ref={year === new Date().getFullYear() ? yearRef : null}
                >
                  <button
                    onClick={() => {
                      setDatePickerDate(
                        new Date(
                          year,
                          datePickerDate.getMonth(),
                          datePickerDate.getDate()
                        )
                      );
                      setPickerMode("days");
                    }}
                  >
                    {year}
                  </button>
                </li>
              ))}
          // ...
style:
.date-picker-years {
  list-style: none;
  display: grid;
  grid-template-columns: repeat(4, 50px);
  grid-template-rows: repeat(50, 50px);
  height: 200px;
  overflow-y: scroll;
}
ten kod wyrenderuje nam wszystkie lata jakie są i po kliknięciu na dany rok to ustawi odpowiednią datę w date pickerze 😊
dodatkowo wykorzystałem useRef, aby przescrollować do aktualnego roku, aby nie trzeba było przewijać ręcznie ;p
(nie miałem lepszego pomysłu, ale działa, więc nie kwestionujmy tego  )
)
Ostateczny kodzik
import { useEffect, useState, ElementRef, useRef } from "react";
import "./App.css";

const generateMonths = () => {
  const now = new Date();

  return Array.from({ length: 12 }, (_, i) => {
    const date = new Date(now.getFullYear(), i + 1, 0);
    return {
      month: date.toLocaleString(navigator.language, {
        month: "short",
      }),
      num: date.getMonth(),
    };
  });
};

const months = generateMonths();

// generate the last 100 years and the next 100 years
const generateYears = () => {
  const currentYear = new Date().getFullYear() - 100;
  return Array.from({ length: 200 }, (_, year) => currentYear + year);
};

const years = generateYears();

const daysInCurrentMonth = (now: Date) => {
  const getDaysInMonth = new Date(
    now.getFullYear(),
    now.getMonth() + 1,
    0
  ).getDate();

  return Array.from(
    { length: getDaysInMonth },
    (_, i) => new Date(now.getFullYear(), now.getMonth(), i + 1)
  );
};

const daysInPreviousMonth = (now: Date) => {
  const firstDayInMonth = new Date(now.getFullYear(), now.getMonth(), 1);

  const generateDays = () => {
    const oneDayInMS = 24 * 60 * 60 * 1000;
    const monday = new Date(
      firstDayInMonth.getTime() - (firstDayInMonth.getDay() - 1) * oneDayInMS
    );

    return Array.from(
      { length: firstDayInMonth.getDay() - 1 },
      (_, i) =>
        new Date(
          monday.setDate(i === 0 ? monday.getDate() : monday.getDate() + 1)
        )
    );
  };

  const isMonday = firstDayInMonth.getDay() === 1;

  return isMonday ? [] : generateDays();
};

const daysInNextMonth = (daysToGenerate: number) => {
  const now = new Date();
  const lastDayInCurrentMonth = new Date(
    now.getFullYear(),
    now.getMonth() + 1,
    1
  );

  return Array.from(
    { length: daysToGenerate },
    (_, i) =>
      new Date(
        lastDayInCurrentMonth.setDate(
          i === 0
            ? lastDayInCurrentMonth.getDate()
            : lastDayInCurrentMonth.getDate() + 1
        )
      )
  );
};

const generateDaysForCalendar = (date: Date = new Date()) => {
  const DATES_TO_GENERATE = 42; // 6 rows of 7 days, like in Windows calendar

  const prevMonth = daysInPreviousMonth(date);
  const currentMonth = daysInCurrentMonth(date);

  const generatedDays = prevMonth.length + currentMonth.length;

  return [
    ...prevMonth,
    ...currentMonth,
    ...daysInNextMonth(DATES_TO_GENERATE - generatedDays),
  ];
};

export const DatePicker = () => {
  const [mode, setMode] = useState<"simple" | "expanded">("simple");
  const [pickerMode, setPickerMode] = useState<"days" | "months" | "years">(
    "days"
  );

  const [datePickerDate, setDatePickerDate] = useState(new Date());
  const [shortDate, setShortDate] = useState(new Date());

  useEffect(() => {
    const interval = setInterval(() => {
      setShortDate(new Date());
    }, 1000);

    return () => clearInterval(interval);
  }, []);

  const toggleDatePicker = () => {
    if (mode === "expanded") {
      setDatePickerDate(new Date());
    }

    setMode((prevMode) => (prevMode === "simple" ? "expanded" : "simple"));
  };

  const handlePreviousYears = () => {
    setDatePickerDate(
      new Date(datePickerDate.setFullYear(datePickerDate.getFullYear() - 1))
    );
  };

  const handleNextYears = () => {
    setDatePickerDate(
      new Date(datePickerDate.setFullYear(datePickerDate.getFullYear() + 1))
    );
  };

  const handlePreviousMonth = () =>
    setDatePickerDate(
      new Date(datePickerDate.setMonth(datePickerDate.getMonth() - 1))
    );

  const handleNextMonth = () =>
    setDatePickerDate(
      new Date(datePickerDate.setMonth(datePickerDate.getMonth() + 1))
    );

  const days = generateDaysForCalendar(datePickerDate);

  const yearRef = useRef<ElementRef<"li">>(null);

  useEffect(() => {
    if (pickerMode !== "years") return;

    yearRef.current?.scrollIntoView({
      block: "center",
    });
  }, [pickerMode]);

  return (
    <div>
      {mode === "expanded" && (
        <menu>
          <h1>Current: {shortDate.toDateString()}</h1>

          {pickerMode === "days" && (
            <button
              onClick={() => {
                setPickerMode("months");
              }}
            >
              {datePickerDate.toLocaleString(navigator.language, {
                month: "long",
                year: "numeric",
              })}
            </button>
          )}

          {pickerMode === "months" || pickerMode === "years" ? (
            <button
              disabled={pickerMode === "years"}
              onClick={() => {
                setPickerMode("years");
              }}
            >
              {datePickerDate.toLocaleString(navigator.language, {
                year: "numeric",
              })}
            </button>
          ) : null}

          <button
            onClick={
              pickerMode === "years" || pickerMode === "months"
                ? handlePreviousYears
                : handlePreviousMonth
            }
            aria-label="Previous month"
          >
            ←
          </button>
          <button
            onClick={
              pickerMode === "years" || pickerMode === "months"
                ? handleNextYears
                : handleNextMonth
            }
            aria-label="Next month"
          >
            →
          </button>

          {pickerMode === "days" && (
            <ul className="date-picker-days">
              {days.map((day, i) => (
                <li key={i}>
                  <button>{day.getDate()}</button>
                </li>
              ))}
            </ul>
          )}

          {pickerMode === "months" && (
            <ul className="date-picker-months">
              {months.map(({ month, num }) => (
                <li key={month}>
                  <button
                    onClick={() => {
                      setDatePickerDate(
                        new Date(datePickerDate.getFullYear(), num, 1)
                      );
                      setPickerMode("days");
                    }}
                  >
                    {month}
                  </button>
                </li>
              ))}
            </ul>
          )}

          {pickerMode === "years" && (
            <ul className="date-picker-years">
              {years.map((year, i) => (
                <li
                  key={i}
                  ref={year === new Date().getFullYear() ? yearRef : null}
                >
                  <button
                    onClick={() => {
                      setDatePickerDate(
                        new Date(
                          year,
                          datePickerDate.getMonth(),
                          datePickerDate.getDate()
                        )
                      );
                      setPickerMode("days");
                    }}
                  >
                    {year}
                  </button>
                </li>
              ))}
            </ul>
          )}
        </menu>
      )}

      <button onClick={toggleDatePicker}>
        <menu className="date-picker-simple">
          <p>
            {shortDate.toLocaleTimeString(navigator.language, {
              hour: "numeric",
              minute: "numeric",
            })}
          </p>
          <p>{shortDate.toLocaleDateString()}</p>
        </menu>
      </button>
    </div>
  );
}
Chcesz się pobawić tym komponentem? To trzymaj linka do CodeSandboxa: https://codesandbox.io/p/sandbox/datepicker-headless-bez-libek-362ynk
🤔 Co można tutaj usprawnić?
- myślę, że można przenieść większość logiki do reducera, aby komponent nie musiał znać jak cała logika działa. przede wszystkim pozbędziemy się zależności między stanami (bo będziemy mieć tylko jeden stan) plus dzięki temu wszystko będziemy mieć w jednym miejscu.
- możemy skorzystać z gotowej biblioteki do obsługi dat np. date-fns, aby nie musieć samemu ogarniać wszystkiego związanego z datami. w ten sposób możemy uprościć kod związany z obsługą date pickera.
- na pewno można zrobić custom hooka, aby odizolować logikę od widoku komponentu.
- no i ofc tak jak wcześniej wspominałem - ten komponent teraz wygląda jak szit 🤮, ale w następnym artykule będziemy go stylować i dodamy animacje, aby wyglądał elegancko 😎
No i to tyle ;p
(PS: co do kanału bewebdev to zamierzam ruszyć z czymś innym niż tylko Code Review, bo chciałbym porobić coś wyzwalającego kreatywność, tak więc stay tuned)